What We Are Building?
A fullstack JavaScript application using React JS and React Apollo on the frontend with Express, GrahpQL and COuchbase on the server.
Working with GraphQL in both React and Express is easy enough to get set up. We will have an Express server with GraphQL in a NodeJS app and we will use Docker to provision and run our Couchbse Server database with a simple one-node cluster.
For help with Docker visit docs.docker.com, if you would like to download and run Couchbase locally without Docker, you can get an installation from our downloads page.
GraphQL High Level Overview
GraphQL is a strongly typed query language for your APIs. It’s a declarative way of fetching data quickly being adopted by the JavaScript and developer community at large and unlike in a RESTful API, it allows granular control over data and saves you from making unnecessary calls to the server. If you are familiar with basic JSON you will find its query syntax simple to use.
A wonderful perk of using GraphQL is the in-browser IDE that we can use to test our queries:
The Couchbase Datastore
We will use Couchbase Server as our document store.
The Couchbase Server NodeJS SDK provides the tools needed to connect via Node and Express to our Couchbase Server and it’s data buckets.
Other SDKs are available besides NodeJS, those SDKs are: C, .NET, Go, Java, NodeJS, PHP, Python and Scala.
Putting Your SQL Skills to Work in NoSQL
Couchbase Server leverages your SQL skills by way of the N1QL (SQL for JSON) Database Query Language which allows you to query Couchbase, a NoSQL document datastore with a syntax nearly identical to SQL. There are some tiny differences in complex queries but for the most part, the SQL you know and use in relational databases can be used to query Couchbase.
Running Couchbase Server with Docker
Get the couchbase image:
1docker pull couchbase
I have a directory on my machine called docker-sandbox where I will setup and run my containers from. Let’s clone an existing repo to get a dockerfile and configuration.sh file that we need:
1git clone https://github.com/httpJunkie/couchbase-server && cd $_ && chmod +x configure.sh
Build a new image from Dockerfile which uses an official couchbase image as its base:
1docker build -t couchbase-server .
Run that new image:
1docker run -d -p 8091-8094:8091-8094 -p 11210:11210 -e CB_ADMIN_USER=Administrator -e CB_ADMIN_PASS=password --network="bridge" --name cbs1 couchbase-server
At this point, we can visit localhost:8091 and login with the Administrator & 123456 username/pass.
Installing Couchbase Server Manually
The installation process is straight forward and we have you covered on Linux, Mac, and Windows.
Logging into Your Local Couchbase Server Console
If you installed with Docker you can skip this section.
Once installed, you can access the Couchbase Server Web Console using localhost:8091. From this screen, you can click ”Setup New Cluster“.
Make the cluster name something simple and setup the admin user and password, this account is a full admin with read-write access to all of your Couchbase Server resources, FYI it’s not what you will use to connect to your database/bucket from our Express client that will be a user that we set up separately. I Configured my cluster with the default service memory quotas. Save and Finish!
Exploring Our Sample Bucket in the Web Console
Let’s access the Dashboard once logged in and click on “Servers” to see our initially created server.
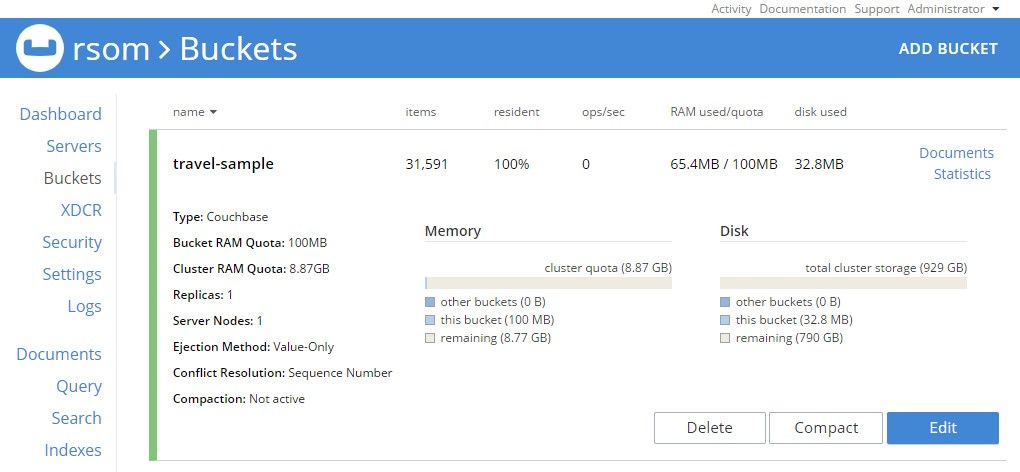
Next click on “Buckets”. A Couchbase Bucket is a document database. The data is stored persistently, as well as in memory.
This allows data to be automatically replicated for availability (see
Database Change Protocol (DCP) for a better understanding of how Couchbase handles replication).
You could click on “Add Bucket” to create your own bucket or to add a sample bucket. If you used the Docker instructions above then we will already have a travel-sample bucket.
Otherwise to complete the tutorial you would need to install this sample bucket.
Using this sample database will allow us to hit the ground running in Express as we have data and indexes already setup. Considering we will want to use N1QL to query our data, we have to first have indexes setup.
For us, these indexes were set up automatically when installing the travel-sample bucket saving us some time. But it’s still a good idea to navigate to the indexes screen in Couchbase Server to ensure and see exactly what these indexes look like.
If you want to learn more and create your own bucket and indexes, check out this article!
At this point,you should see our travel-sample bucket, just like in the image below:
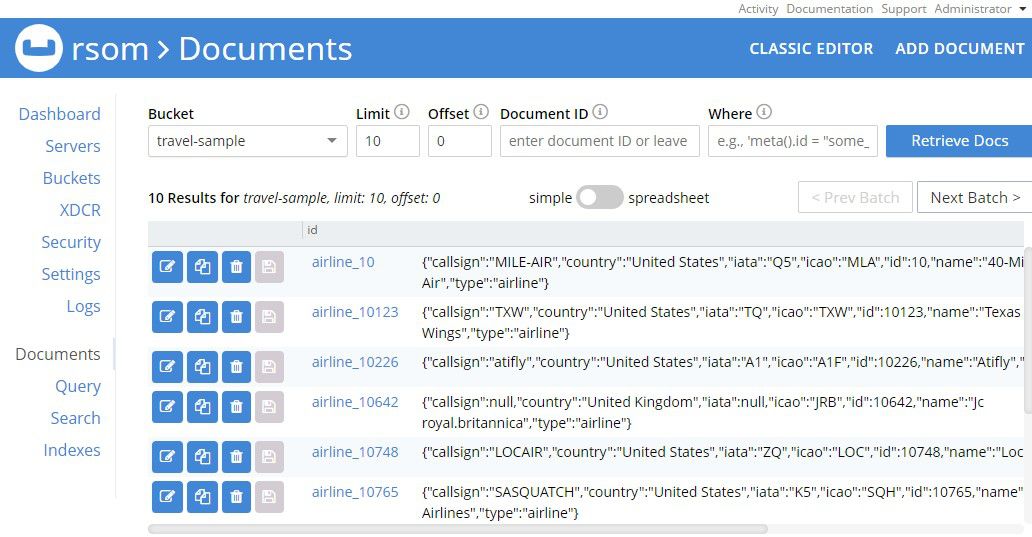
If we click on the “Documents” button we can see some of the data in our Bucket:
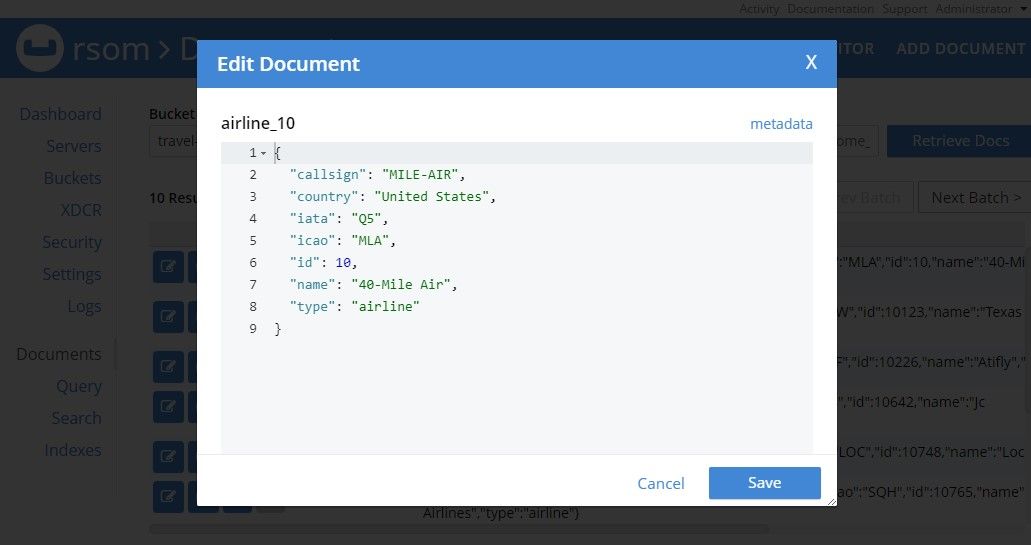
And further, we can click “Edit Document as JSON” to view or alter the JSON for a particular document. Remember that Couchbase is a key value store, for every key it has a value which typically will be a JSON document. Theoretically it could be any blob of text, but we will only be working with JSON as our data structure.
Before moving on, we want to click on the “Security” tab and set up a user to connect to this bucket. In Couchbase each bucket is a coleection of data, each document can have a special type setting itself a part from other documents with a different type. This is analogous to having a database with different tables in a relational database. Each bucket can have a user associated with it, the user we setup will be for the purpose of connecting to this data bucket from our SDK inside of a NodeJS application.
Once we are on the “Security” page, let’s click on “Create User” in the upper right.
We need to add a username and password specific for connecting to the bucket.
In the image, I use my own name and it will match the info in the source code for the project.
Remember that you will want to use your own name and update the .env file of the project with your own credentials.
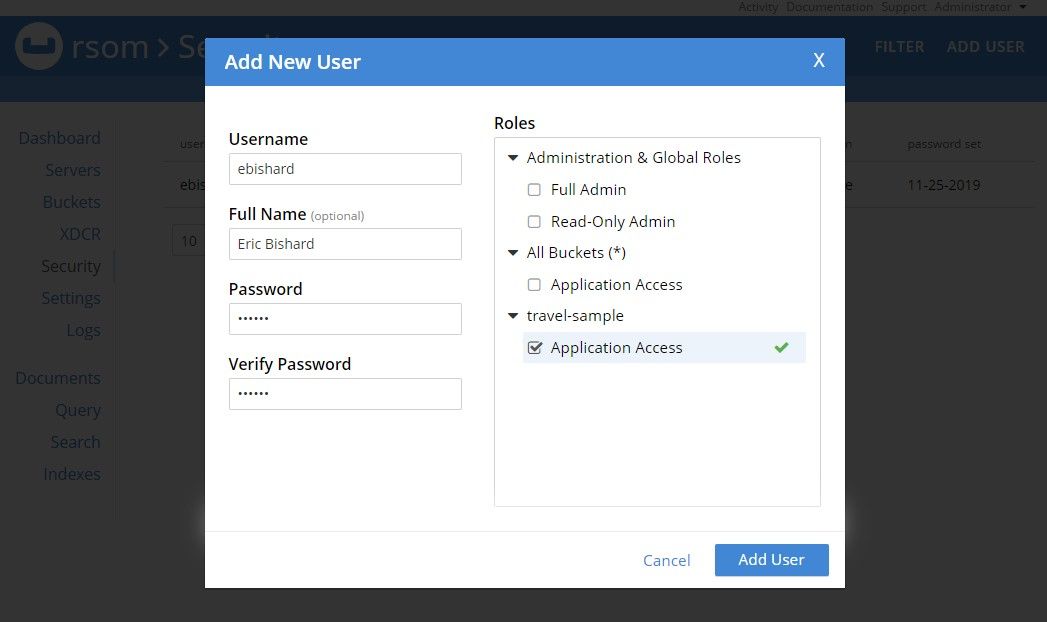
Make sure to check the “Application Access” checkbox for our travel-sample bucket. That’s all we need.
Remember your username and password, as we will need this to connect.
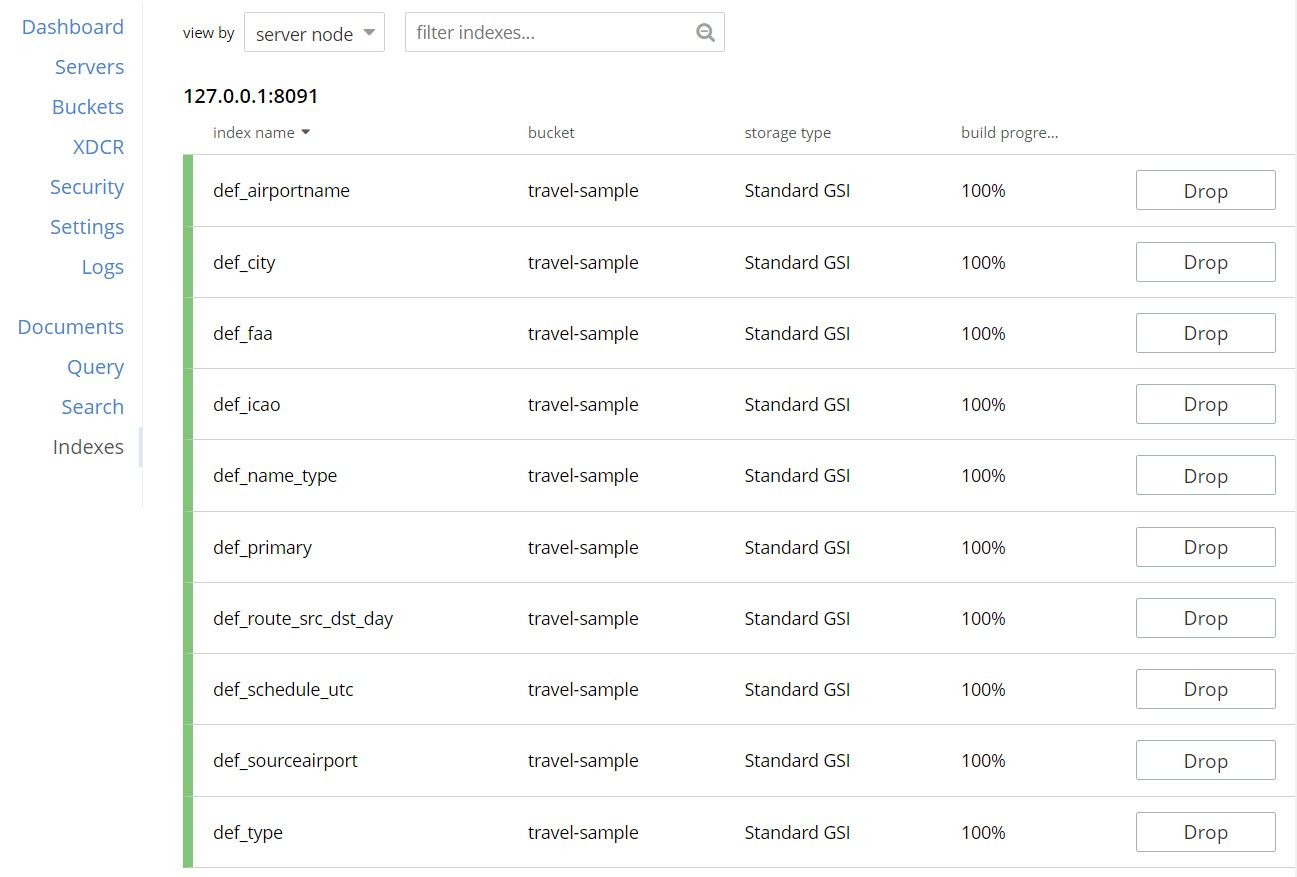
Bucket Indexes
For this demo, we have our indexes for the travel-sample database already setup.
If you wanted to add more indexes, you can use an API endpoint or hop into the “Query” tab inside Couchbase Server and execute the SQL needed to create the index.
A familiarity with SQL will make this task second nature!
If you want to learn more about setting up indexes, you can find more information in this Coucbase blog article and in the couchbase documentation. Below is an image of the indexes that are set up with our travel-sample bucket.
A Quick Mention about N1QL Queries
Couchbase Server gives you the ability to use N1QL queries which is a way to query our buckets using a SQL-like syntax.
We will use a combination of that and an API provided by the couchbase npm package to do our querying.
You can find more information on N1QL in the documentation as well as information about using the couchbase.get() method which is better for retrieving one specific record.
All covered in the Couchbase Server NodeJS SDK.
Creating Our Node, Express-GraphQL API
If you need to learn more about GraphQL, I recommend reading the following:
Create Our Overall Project Directory and Ignore File
We need to create a directory on your machine for our project, we will call it rage-with-couchbase:
1mkdir rage-with-couchbase && cd $_
mkdir will create a new directory using the string rage-with-couchbase for the folder’s name, bash stores that string in a variable we can use immediately named $_.
we change directories using $_ ensuring we don’t misspell the directory on the concatenated command (it’s bash magic).
Now let’s create a .gitignore file in the root of our project.
1touch .gitignore && echo "node_modules/" >> .gitignore
touch will generate a .gitignore file.
echo and >> will add the node_modules/ txt inside the .gitignore file, this will serve to ignore all node_modules directories in the root and all subdirectories.
Creating Our Express Server
Now we will create the directory to store our Express server and we will use npm to manage its packages.
1mkdir couchbase-gql-server && cd $_ && npm init -y
mkdir will create a new folder inside the project root specifically for our server using the string couchbase-gql-server for the name, this is your server project directory.
we change directories and use the $_ (more magic) and then we initialize an npm project using npm init -y accepting the default values with the -y flag.
Install Our Server Dependencies
1npm install graphql express express-graphql couchbase
This will take some time, but once it’s done running, we should now have Visual Studio Code open and our project is ready for us to start working in!
Create `server.js File
1touch server.js
Add Server and Set up Our Require Statements
Let’s switch to our IDE and add the following code to the server.js file:
1const express = require('express')2const graphqlHTTP = require('express-graphql')3const { buildSchema } = require('graphql')45const couchbase = require('couchbase')
This will bring in everything we need to get our GraphQL server setup.
The first three imports are needed for our GraphQL server and the last import is required for connecting to and querying our Couchbase Server.
Initialize Express and Connect to Our Bucket
Create an Express app and connect to our Couchbase Server bucket. Add the following code:
1const app = express()2const cluster = new couchbase.Cluster("couchbase://localhost:8091/")3 cluster.authenticate("ebishard", "123456")45const bucket = cluster.openBucket("travel-sample")
Above we are connecting to our Couchbase Server cluster, authenticating with our user that we set up, and opening our travel-sample bucket.
Create Our GraphQL Schema
Adding the code below will define two endpoints that will enable our GraphQL Server to access and retrieve data form our documents inside of our Couchbase Server bucket.
1const schema = buildSchema(`2 type Query {3 airlinesUK: [Airline],4 airlineByKey(id: Int!): Airline5 }6 type Airline {7 id: Int,8 callsign: String,9 country: String,10 iata: String,11 icao: String,12 name: String13 }14`)
Each Query type is the same as a regular object type, but special in the fact that they define an endpoint of every GraphQL query. We have two endpoints and each one is using a type called Airline.
The first object property is fetching a list of Airlines in an endpoint named airlinesUK.
In another endpoint we are fetching a single Airline by id using the Buckets key-value, that endpoint will be called airlineByKey and it will take an id and return the data in the format of type Airline.
If you remember from our Bucket images above, each document is defined by a key in a format like airline_1234 where 1234 is the id of the airline.
We will keep this id in mind when using the NodeJS SDK to fetch our individual airlineByKey using a simple bucket.get() method.
Create Our Resolver Implementation for Each Endpoint
Now, that we have defined two queries in our GraphQL API by way of our schema object, we need an implementation in JavaScript for retrieving the data.
Our React application that we will create will only need the N1QL query named airlinesUK.
But I wanted to show you how to query without N1QL using the NodeJS SDK’s API using just a key, that is the airlineByKey implementation.
Add the following code to our server.js file:
1const root = {2 airlinesUK: () => {3 let statement =4 "SELECT META(airline).id, airline.* " +5 "FROM `travel-sample` AS airline " +6 "WHERE airline.type = 'airline' " +7 "AND airline.country = 'United Kingdom' "8 let query = couchbase.N1qlQuery.fromString(statement);9 return new Promise((resolve, reject) =>10 bucket.query(11 query, (error, result) => error ? reject(error) : resolve(result)12 )13 )14 },15 airlineByKey: (data) => {16 let dbkey = "airline_" + data.id17 return new Promise((resolve, reject) =>18 bucket.get(19 dbkey, (error, result) => error ? reject(error) : resolve(result.value)20 )21 )22 }23}
Just to drive this home, we are using two different methods to query our Couchbase Server.
The first method used by the airlinesUK resolver uses the bucket.query method and in turn that takes in an N1QL or standard SQL query. This is great because if you are familiar with SQL which most of us are, it makes the barrier to entry a lot less steep when working with document databases in Couchbase Server.
The second method used is the bucket.get method and in this case we are just defining the key of our document for easy retrieval from our bucket. Remember that one of the great things about using a key-value data store to store our documents is that we can easily pick out a single document with little overhead.
Each of the methods above also tests for query errors and either resolve or reject based on a result or error.
NOTE: I have broken up my N1QL query into separate concatenated lines for readability and at the end of each line there is a space before the closing quote. Beware that without those extra spaces, your N1QL query will generate an error.
Creating Our Express-GraphQL Server
Now that we have everything sorted out for our endpoints and queries, all we need to do is use our Express server and give it a port to run on, let’s do that now.
Add the following code to the end of our server.js file:
1const serverPort = 40002const serverUrl = '/graphql'3app.use(serverUrl, graphqlHTTP({4 schema: schema,5 rootValue: root,6 graphiql: true7}))89app.listen(serverPort, () => {10 let message = `GraphQL server now running on http://localhost:${serverPort}${serverUrl}`11 console.log(message)12})
First we set up our port and GraphQL URL.
Next, we pass in our GraphQL schema and it’s resolvers and set our graphiql option to true.
(This will give us an IDE to test our GraphQL queries available at localhost:4000/graphql.
Finally, we listen on port 4000 and set a message in the console to indicate our server is running.
Let’s run our server, ensure that your Couchbase :
1node server
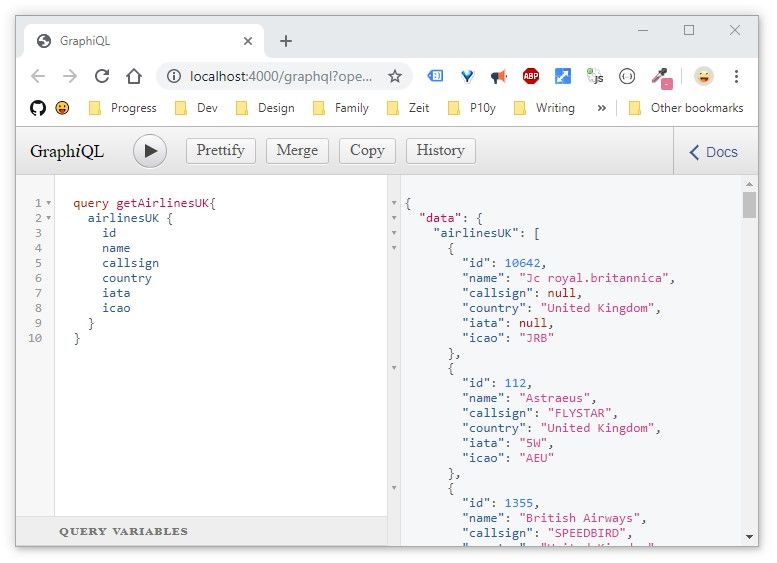
Once we have the GraphQL server running we can test the AirlinesUK query by pasting the following code into the GraphQL IDE query pane:
1query getAirlinesUK{2 airlinesUK {3 id4 name5 callsign6 country7 iata8 icao9 }10}
As the query indicates it will retrieve all of our UK based airlines:
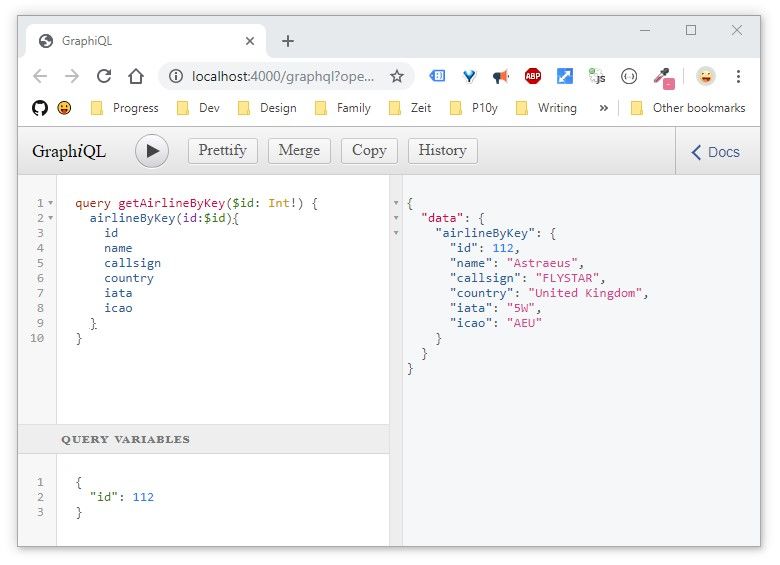
Next, we will use the airlineByKey endpoint. We will also need to create a query variable ({ "id": 112 }) and paste it into the query parameter pane which my be collapsed at the bottom of the GraphQL IDE:
1query getAirlineByKey($id: Int!) {2 airlineByKey(id:$id){3 id4 name5 callsign6 country7 iata8 icao9 }10}
1{2 "id": 1123}
And with that in place and we can query again and retrieve a single airline document by key:
This concludes the section for our GraphQL Server, we are now ready to create our React application that will use these endpoints to create a very small application with a master-detail page that will get all UK airlines and show them in a list and when we click on one, in particular, it will show the full details of the airline.
Creating the React Application
The intent of this tutorial is not to teach you how to build the entire React portion of the application step by step, I have prepared code for each page that you can copy and paste to save us the work.
For this reason, we are going to clone an existing repo into our project, it will have all of the basic setup that I created using Create React App. It will have basic routing and existing components ready to hook up. What we will focus on instead is specifically the portion that deals with fetching the data from GraphQL and setting up the Apollo client using React Apollo.
Clone an Existing React Application
Our decoupled React frontend will be a sibling to the server directory. Our goal is to have the following directory structure:
1rage-with-couchbase2│3└───couchbase-gql-server4│5└───react-apollo-client
Let’s run the following git command from the rage-with-couchbase directory in our terminal in order to clone the starting point for our React project:
1git clone https://github.com/httpJunkie/react-apollo-client.git && cd react-apollo-client && rm -rf .git
This will clone the existing repo and then remove its association with my GitHub account, it’s similar to just cutting and pasting in a bunch of files and creating your own repo.
Once this is done we will have a working React application with basic routing, as well as some components and utilities that we will use to fill out our application.
Let’s run the project to ensure everything is working:
1npm install && npm start
We should be able to navigate the few routes using our menu and have zero errors and warnings in the console.
Before we make more changes to this React project, let’s understand some of the files that we will be bringing into our project to work with our Airline page.
Overview of Our Assets
We have 6 files that are not used once we clone the React app and run it for the first time, but they are there and standing by for us.
- hoc/withApolloProvider.js
- partial/airline-list.jsx
- partial/airline-details.jsx
- utility/pagination.jsx
- utility/pagination.scss
- routes/airline-gql.js
withApolloProvider - I am using a higher-order component that I created so that I can wrap any component with a diferent GraphQL provider and endpoint if needed. Just understand that this is similar to importing the ApolloProvider in the parent component. This may or may not help you, I have used it in many projects and continue to use it just in case I need the exact same fnctionality. I also feel like it cleans things up and is easier mental model for me. Below is the withApolloProvider code:
1import React from 'react'2import ApolloClient from 'apollo-boost'3import { ApolloProvider } from '@apollo/react-hooks'45const withApolloProvider = (WrappedComponent, graphqlEndpoint) => {6 const apolloClient = new ApolloClient({7 uri: graphqlEndpoint,8 })910 return (props) => (11 <ApolloProvider client={apolloClient}>12 <WrappedComponent {...props} wrappedBy={"withApolloProvider"} />13 </ApolloProvider>14 )15}1617export default withApolloProvider
We have a airline-list.jsx and a airline-details.jsx these two components will get loaded side by side in our airlines.jsx component. The list will simply display each airline and uses pagination.jsx to ensure we don’t have a super long list running down the side of our page.
Finally, we have the airline-gql.js file which is simply our GraphQL query for all UK Airlines. I like to separate my queries out into another file for organizational purposes, it’s not required, but it cleans up the airlines.jsx file.
How Our Master-Detail Page Works
In our project we have a master-detail component relationship, when we are at the route for /airlines, we display a component called airlines.jsx,
it uses React Router and when no specific arlineId is present in the URL like the path below:
http://localhost:3000/airlines
It will display a list of the airline on the left side and “Select an airline” on the right side of the page. Selecting an airline from the menu will load details on the right side of the page. It’s pretty simple, we will use the capabilities of React Router to pass the Airline name from the path we load when a menu item is clicked:
http://localhost:3000/airlines/1355
Here we will match the ID 1355 with the correct airline already in memory in our React application data and display its appropriate Airline information “British Airways”.
Adding Dependencies to Work with Graphql and Apollo
To work with our GraphQL we will be using three packages: @apollo/react-hooks, apollo-boost, and graphql, you can bring them all into your project now because they are not included yet, cd into your react-apollo-client directory and run the install for the packages we need for GraphQL and Apollo:
1npm install @apollo/react-hooks apollo-boost graphql
For more information on working with Apollo and GraphQL you can check out the many resources on https://www.apollographql.com, this link is a perfect place to start if you want to get acclimated with making queries using Apollo.
Building The Master-Detail Page
With those files explained, we can get started building the Airlines master-detail page and our first thing will be to bring in some imports that we will need:
1import { useQuery } from '@apollo/react-hooks'2import { airlineGql } from './airline-gql'
We do our queries from Apollo with a Hook named useQuery. When we use it we need to pass it a GraphQL query string and that is exactly what the next import is all about.
Inside the airline-gql.js file is and could be all queries needed pertaining to this GraphQL endpoint, we only have one, but by organizing in this fashion we are thinking about organization and boundaries in our application:
1import { gql } from 'apollo-boost'23export const airlineGql = gql`4 {5 airlinesUK {6 callsign7 country8 iata9 icao10 id11 name12 }13 }14`
Next, we import withApolloProvider, a higher-order component.
1import withApolloProvider from '../hoc/withApolloProvider'
This will wrap our component with and Apollo Provider, give us the ability to use multiple endpoints in our project if needed (we only will use one, sorry for overengineering).
With that in place we need to update the export of my airlines.jsx file also:
1const WrappedComponent = withApolloProvider(Airlines, 'http://localhost:4000/graphql')2export default WrappedComponent
Our first argument to the HOC is the component that we are wrapping with the provider Airlines (already defined in this file) and the GraphQL endpoint as a second argument.
Our final imports are the two components that I have already built for you (airline-list.jsx and airline-details.jsx):
1import AirlineList from '../partial/airline-list'2import AirlineDetails from '../partial/airline-details'
Once those two files are imported we can add their component syntax to our flexbox grid (simple-flexbox that we have created helping us to easily split our page by a percentage:
1<Row horizontal="spaced">2 <Column flexGrow={1} style={{ minWidth: '280px', width: '65%' }}>3 <AirlineList airlines={airlines} />4 </Column>5 <Column flexGrow={1} style={{ width: '45%' }}>6 <AirlineDetails airline={airline} />7 </Column>8</Row>
With all of this in place, we just need to deal with our data and useQuery returns an object from the Apollo Client with loading, error, and data properties we can use. We also need to match on our route path, we have access to that with React Router on the page (match.params).
This next bit of code will replace the curent Airlines component, injecting some additional code just before the return statement:
1const Airlines = ({ match }) => {2 const airlineId = Number(match.params.id) //13 const { loading, error, data } = useQuery(airlineGql) //245 if (loading) return <p>Loading...</p> //36 if (error) return <p>Error :( <span style={{color: 'red'}}>{error.message}</span> )</p> //478 const airlines = data.airlinesUK //59 const airline = match.params.id ? airlines.find(a => a.id === airlineId) : null //61011 return (
- Here we are setting
airlineIdif thematch.params.idreturns a number and notundefined(do we have an ID in our route path/airlines/1355or not/airlines/?). - Next we are using the GraphQL query string exported in our
airlineGqlfile. Remember that it returns stuff, so we are destructuring those here as well. - We return “loading” until the data has finished loading
- or “Error” in the case our GraphQL server is not running or has an error, etc…
- We capture the data for all of the airlines returned from our query into a local variable named
airlines - If
match.params.idcontains a number it means our route contains an ID, in this case we capture the data for that specific airline into a local variable namedairlineotherwise we store a null value in that variable.
The match will work because of the way we set up our route in the App.js page:
1<Route exact path={["/airlines/:id", "/airlines/"]}2 render={(props) => <Airlines {...props} />}3/>
This route in effect says: Look for a route with the name /airlines/ and anything after it will be available using the match.params.id syntax.
If we run our project right now and our GraphQL Server is not running, we get an error that says: “Error :( Network error: Failed to fetch )” printed out on our page. So we need to go and start that server before we run our React application to test out our master-detail page.
Running Our Full Stack application
At this point, we just need to ensure our Couchbase Server instance is up and running, and from the root of our project start our Express server (in turn running our GraphQL server) running node couchbase-gql-server/server, then run our React project using cd react-apollo-client/ && npm start!
If you run into an error because of CORS, we need to add a few to your Express project’s server.js file, just update with the following:
1const express = require('express')2const cors = require('cors')3const graphqlHTTP = require('express-graphql')4const { buildSchema } = require('graphql')56const couchbase = require('couchbase')78const app = express()9app.use(cors())
And we will need to npm install cors. That package is on GitHub at github.com/expressjs/cors and more information can be found on this topic in an article titled: ”How to enable CORS for Express-GraphQL & Apollo Server”
Once that is in place, restart your Express server and React application and viola!
Running Both Server and Client using Postinstall and Concurrently
Now that we have everything working, I’d like to show you a neat trick for running these two projects at the same time with one npm command!
We need to initialize an npm project in our root directory, currently the root of the Git project, but the server and client both have their own independent node projects. This is fine, it will stay that way, but we are going to make the root of the project it’s own npm project as well.
Change directories to the root and run:
1npm init -y && npm install concurrently --save-dev
This will initialize npm and accept all defaults (otherwise remove the -y flag) and install the package we need to concurrently run both projects with one command.
Let’s setup the scripts individually and one script to run them together using start, we also will use postinstall to run each project’s install scripts independently when the root’s install is run. postinstall is part of npm scripts by default. Replace the current lines in your package.json with:
1"name": "rage-with-couchbase",2"version": "0.1.0",3"description": "Concurrently run GraphQL Express Server and React application from the rage-with-couchbase project",4"scripts": {5 "client": "cd react-apollo-client && npm start",6 "server": "cd couchbase-gql-server && node server",7 "start": "concurrently --kill-others \"npm run server\" \"npm run client\"",8 "postinstall": "(cd couchbase-gql-server && npm install); (cd react-apollo-client && npm install);"9},
We have updated the name and description of our overall root project, set up two scripts for client and server that we can run concurrently with npm start on the root. Also, when someone clone’s our repository, they can now run: npm install && npm start and it will install all packages from the three projects and afterward spin them up, so long as they have Couchbase Server running, it will all just work.
Remove Username and Password From Server
One final nice touch would be to move our username and password for Couchbase Server out to its own .env file so that we are not shipping our username and password to GitHub for the world to see.
Change directories to couchbase-gql-server/ and install dotenv:
1npm install dotenv --save-dev
Next, import dotenv and destructure the variables we will have set up in our .env file
1require('dotenv').config()2const { CBSU, CBSP } = process.env
Update the code where we use the username and password:
1const cluster = new couchbase.Cluster("couchbase://localhost")2 cluster.authenticate(CBSU, CBSP)
Manually Removing Couchbase Server From Mac
Just in case you need to do this for some reason, when you uninstall Couchbase Server from your Mac you will need to follow a few steps:
- Stop / Quit Couchbase Server from the Mac menu bar
- Use your UI to Delete Couchbase Server from Applications
- Remove the directory at
Library/Application\ Support/Couchbase - Remove the directory at
Caches/com.Couchbase(if exists)
Project Recap
We have set up a complete full-stack application and we did the entire thing with the knowledge of only JavaScript and JSON, which is amazing to me. This application has a NoSQL data store that can scale and in future tutorials, we can build more onto this application and scale it to deploy to the cloud, replicate and distribute data to other buckets of data, implement testing, really, the sky is the limit. Its ability to be horizontally scalable is there with NoSQL, we just have to keep learning and keep building one piece at a time, if you hang around, we can do these things and learn together. If you have reached this text, it’s most likely because you have completed this entire project and I want to congratulate you on your new skills and knowledge. Don’t let that slip away, keep building and iterating and make awesome things, let me know on Twitter @httpJunkie what you think about this tutorial and if you faced any issues!